Automating software installation in IaaS environments to provide additional services to customers (e.g., IaaS or SaaS solutions based on IaaS) is a common challenge for many service providers. Acronis Cyber Protect integrates backup with next-generation, AI-based anti-malware and endpoint protection management into one solution. This article describes how to automate the Acronis Cyber Protect Agent installation and apply a Protection Plan. This is the updated version of the previous article Automate Acronis Agent Installations.
API usage and security considerations for agents automation installation
Starting from Acronis Cyber Cloud 9.0, the Acronis Cyber Protect Agent can be silently installed and registered in the cloud using time-limited registration codes. You still can use the username and password combination for backward compatibility, but the registration codes give a more secure, advanced, and reliable way to automate Acronis Cyber Protect Agent installations.
Acronis Cyber Protection Agent setup parameters
You can open the setup program parameters dialog for Windows installer with the following command:
./Cyber_Protection_Agent_for_Windows_x64.exe --help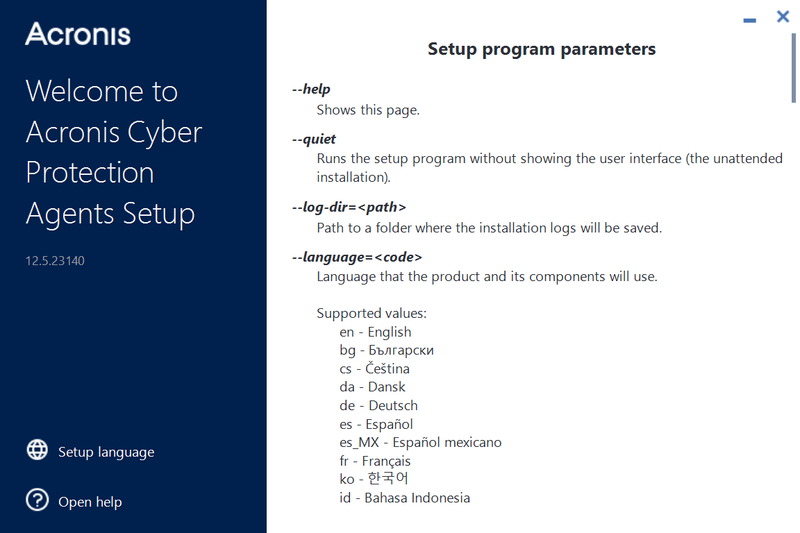
Notice the parameters that we need for a simple scenario of automating agent installation on Windows:
To check the command line parameter for Linux installations, you can run the Linux setup program with this command:
sudo ./Cyber_Protection_Agent_for_Linux_x86_64.bin --help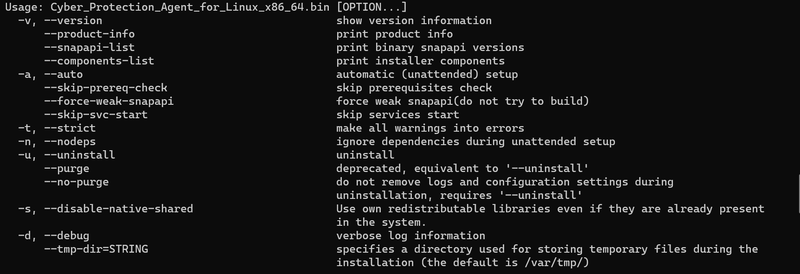
Notice the parameters that we need for a simple scenario of automating agent installation on Linux:
Acronis Account Management API calls to generate a registration token
API Authorization Basis
A JWT token with a limited time-to-live is used to securely manage any API clients' access, like scripts and integrations, for the Acronis Cyber Cloud. Using a login and password for a specific user is not a secure and manageable way to create a token, but technically it's possible.
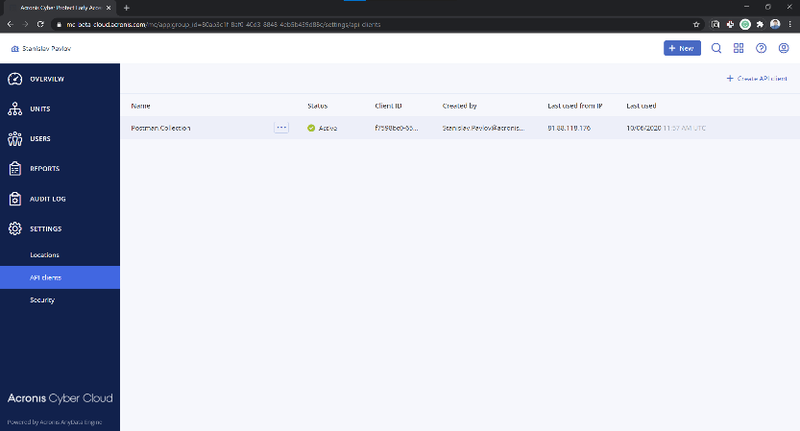
Acronis Cyber Cloud API Client credentials can be generated in the Management Portal.
A generated client has inherited access rights from the user generating the token, but is disconnected from this user. You don't need to issue a new client when the user account is removed from Acronis Cloud.
To issue a token, /idp/token endpoint is called using POST request with grant_type param equal client_credentials and Content-Type application/x-www-form-urlencoded with Basic Authorization using a client_id as username and a client_secret as password.
Note: Each token has a time-to-live and must be renewed/refreshed before it expires. The best practice is to check before starting any API calls sequence and renew/refresh if needed.
Note: Currently, the default time-to-live for a token is two hours.
The successful answer is a JSON with the following fields:
- id_token
- access_token
- expires_on
- token_type
expires_on is when the token expires in Unix time format – seconds from January 1, 1970.
Use the received access_token with the Bearer Authorization for all following API requests.
Generate an agent registration token
The /api/2/tenants/{customer_tenant_id}/registration_tokens endpoint is used to generate an Agent registration token, customer_tenant_id is an id of a customer tenant for which a user belongs for which the agent should be registered. This endpoint requires Bearer Authorization with a valid JWT token created using the /idp/token endpoint.
To generate a token, the /api/2/tenants/{customer_tenant_id}/registration_tokens endpoint is called using POST request with Content-Type application/json and a JSON body contains 2 fields and 1 array:
- personal_tenant_id
- expires_in
- scopes
personal_tenant_id is an id of a user tenant where the agent should be registered.
expires_in is the time interval before the token expires in seconds.
scopes are initial registration token access scope. In the example below, the token receives rights to register the Agent for a specified tenant and apply/revoke policy with id dada2e75-2875-4565-88c6-53f2e4bf9b67 defined in the customer tenant for which that user belongs - 1952007 - big int tenant identifier.
Here is an example of a token generated for a user with a personal tenant with id 1628fcea-554e-4d57-9715-30a42b9d1451 which is belong to a tenant with 65f92900-6cb2-499e-ac3b-39421b350eeb id and valid for 3 days.
POST /api/2/tenants/65f92900-6cb2-499e-ac3b-39421b350eeb/registration_tokens
Content-Type: application/json
{
"expires_in": 259200,
"scopes": [
"urn:acronis.com:tenant-id:1628fcea-554e-4d57-9715-30a42b9d1451:backup_agent_admin",
"urn:acronis.com::policy_management:1952007|dada2e75-2875-4565-88c6-53f2e4bf9b67:apply_revoke"
]
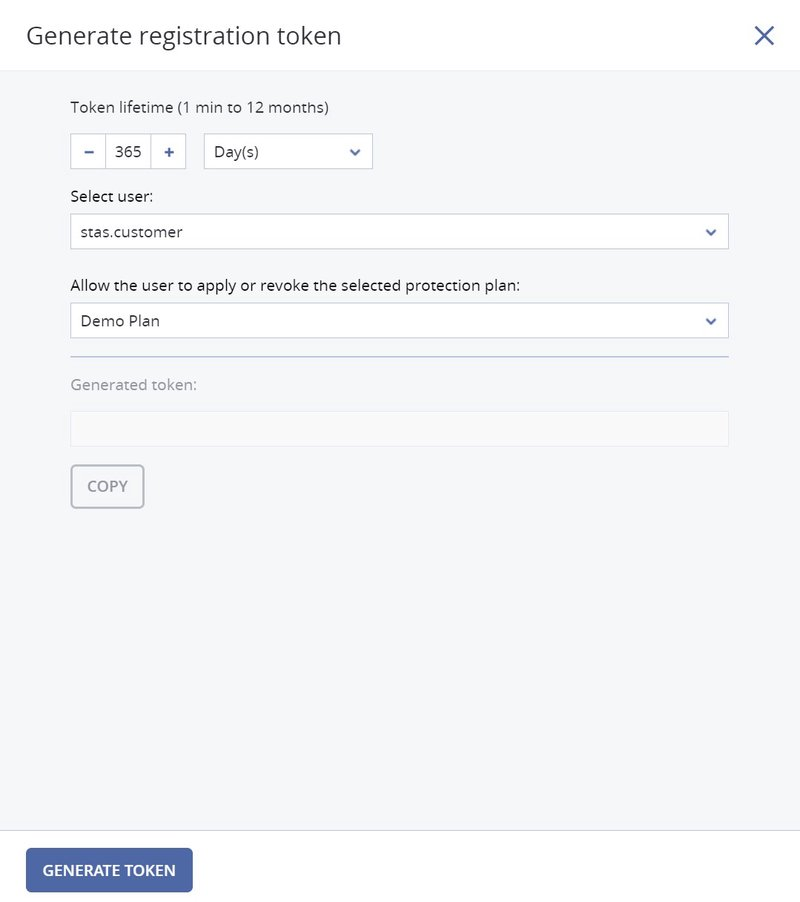
}Another way to manage tokens is to generate a token with a long life-time and use it for all or a specific group of machines to install the Agent. In that case, it would be much simple to use the Service Management Console to generate a token then write code to generate it.
Base scripts to install the Acronis agent on a Windows computer and apply a Protection Plan
The following scripts provide the base flow to perform the Acronis agent installation and apply a protection plan. We expect that the script uses a previously manually generated registration token with a long life-tine as input - $regToken, together with Acronis' datacenter URL - $baseUrl.
At first, we need to install the Agent, below is a simple example without error handling.
.\Cyber_Protection_Agent_for_Windows_x64.exe --quiet --registration by-token --reg-token $regToken --reg-address $baseUrl
During the agent registration, a new resource is registered in the Acronis Cyber Cloud, after that, it's possible to apply a protection plan to that resource. Below you can find a simple example without error handling.
# read recource id from registry

$resourceId = Get-ItemProperty -Path "HKLM:\SOFTWARE\Acronis\BackupAndRecovery\Settings\MachineManager" | Select-Object -ExpandProperty InstanceID

# At first we need to exchange registration token to an authorization token

# Use param to tell type of credentials we request

$postParams = @{ grant_type = "urn:ietf:params:oauth:grant-type:jwt-bearer&assertion" ; assertion = $regToken}

# Set the content type

$headers = @{ Content-Type = "application/x-www-form-urlencoded"}

# Exchanhe the token

$token = Invoke-RestMethod -Method Post -Uri "${baseUrl}bc/idp/token" -Headers $headers -Body $postParams

$accessToken = $token.access_token

# Body JSON, to apply policy included into the registration token

# policy id doesn't need as it included into the installation token

$json = @"

{

	 "context": {

		 "items": [

			 "${resourceId}"

		 ]

	 }

}

"@

$bearerAuthValue = "Bearer $accessToken"

$headers = @{ "Authorization" = $bearerAuthValue }

$headers.Add("Content-Type", "application/json")

$result = Invoke-RestMethod -Method Post -Uri "${baseUrl}api/policy_management/v4/applications" -Headers $headers -Body $json
Base scripts to install Acronis agent on a Linux computer and apply a Protection Plan
The following scripts provide the base flow to perform the Acronis agent installation and apply a protection plan. We expect that the script uses a previously manually generated registration token with a long life-tine as input - $_reg_token, together with Acronis' datacenter URL - $_base_url.
export HISTIGNORE='*sudo -S*'

echo "" | sudo -S -k ./Cyber_Protection_Agent_for_Linux_x86_64.bin -a --rain "${_base_url}"  --token "${_reg_token}"
During the agent registration, a new resource is registered in the Acronis Cyber Cloud, after that, it's possible to apply a protection plan to that resource. Below you can find a simple example without error handling.
# You need appropriate right to read /etc/Acronis/BackupAndRecovery.config file

# Put resource id to the file for the script debug simplicity

while _read_dom; do

    _parse_dom

done < /etc/Acronis/BackupAndRecovery.config > ~/resourceId.txt

# Put resource id into the variable

_resource_id=$(cat ~/resourceId.txt | sed -e 's/^"//' -e 's/"$//';)

# Exchange registration token to authorization token

_post_api_call_bearer_urlencoded "bc/idp/token" \

					"application/x-www-form-urlencoded" \

					"grant_type=urn:ietf:params:oauth:grant-type:jwt-bearer"  \

					"assertion=${_reg_token}"  \

					 > ~/access_token.json

# Get access_token from file

_access_token=$(_get_access_token_from_file "~/access_token.json")

# Construct JSON to apply a protection plan

_json='{

     "context": {

         "items": [

             "'$_resource_id'"

         ]

     }

}'

# To apply a protection plan

# POST API call using function defined in basis_functions.sh

# with following parameters

# $1 - an API endpoint to call

# $2 - Content-Type

# $3 - POST data

# The result is stored in results.json file

_post_api_call_bearer "api/policy_management/v4/applications" \

					"application/json" \

					"${_json}" > "~/results.json"

Below you can find helper functions used in the script above.

# XML config file needs to be parsed to find resource id

# We will use a simple example from https://stackoverflow.com/questions/893585/how-to-parse-xml-in-bash

# As it's well documented in that post

_read_dom () {

    local IFS=\>

    read -d \< ENTITY CONTENT

    local RET=$?

    TAG_NAME=${ENTITY%% *}

    ATTRIBUTES=${ENTITY#* }

    return $RET

}

# Read config file, find value tag with name InstanceID and echo CONTENT

_parse_dom () {

    if [[ $TAG_NAME = "value" ]] ; then

        eval local $ATTRIBUTES

        if [[ $name = "InstanceID" ]] ; then

            echo $CONTENT

            exit

        fi

     fi

}

# Below you can find some helper functions to call Acronis REST API

# Print errors info to STDERR and exit execution

_die() { printf ":: %s\n\n" "$*" >&2; exit 1; }

# Pipe JSON from file, extract JSON property, remove quotas from the property's value

_get_access_token_from_file(){ jq '.access_token' < "${1}" | sed -e 's/^"//' -e 's/"$//'; }

# POST API call with Bearer Authentication

# $1 - an API endpoint to call

# $2 - Content-Type

# $3 - urlencoded data 1st param

# $4 - urlencoded data 2st param

_post_api_call_bearer_urlencoded () {

  local _response_body

  local _response_code

  curl	-s \

		-X POST \

		--url "${_base_url}${1}" \

		-H "Authorization: Bearer ${_access_token}" \

		-H "Accept: application/json" \

		-H "Content-type: ${2}" \

		--data-urlencode "${3}" \

		--data-urlencode "${4}" \

		-w "\n%{http_code}" | {

			read -r _response_body

			read -r _response_code

			_response "${_response_body}"

			if [[ $_response_code = 20* ]] ; then

  				echo "${_response_body}"

			else

				_die "The POST API Call with the endpoint ${1} is unsuccessful with response code: ${_response_code}." "${_response_body}"

			fi

		}

}

# POST API call with Bearer Authentication

# $1 - an API endpoint to call

# $2 - Content-Type

# $3 - POST data

_post_api_call_bearer () {

  local _response_body

  local _response_code

  curl	-s \

		-X POST \

		--url "${_base_url}${1}" \

		-H "Authorization: Bearer ${_access_token}" \

		-H "Accept: application/json" \

		-H "Content-type: ${2}" \

		--data-raw "${3}" \

		-w "\n%{http_code}" | {

			read -r _response_body

			read -r _response_code

			_response "${_response_body}"

			if [[ $_response_code = 20* ]] ; then

  				echo "${_response_body}"

			else

				_die "The POST API Call with the endpoint ${1} is unsuccessful with response code: ${_response_code}." "${_response_body}"

			fi

		}

}
Summary
Now you know how to automate the Acronis Cyber Protection Agent installation and apply a protection plan and have practical examples of how to proceed with this task for Windows and Linux environments.
For further API learning, register at our Platform Program or Developer Network on https://developer.acronis.com site.
Find our public Postman API collection for standard automation and integration tasks https://explore.postman.com/grey-rocket-585331 or use our GitHub examples https://github.com/acronis.
About Acronis
Acronis is a Swiss company, founded in Singapore. Celebrating two decades of innovation, Acronis has more than 1,800 employees in 45 locations. The Acronis Cyber Protect Cloud solution is available in 26 languages in over 150 countries and is used by 20,000 service providers to protect over 750,000 businesses.